
Adding Your Custom Domain to Clixio
Our Service

Home Decor
Lorem ipsum dolor sit amet, consectetur
sed do eiusmod tempor incididunt ut labore et dolore magna aliqua.
Home Decor
Lorem ipsum dolor sit amet, consectetur
sed do eiusmod tempor incididunt ut labore et dolore magna aliqua.

Purpose/Objective
As a Clixio customer, adding your custom domain (e.g., myownwebsite.com) to your account replaces default Clixio URLs (like app.clixio.io) with your branded links for funnels, sites, and emails. This enhances your business’s professionalism and trust. This guide provides clear, step-by-step instructions for you, the customer, to connect your domain with Clixio’s support. Your domain won’t be active until verified, so let’s set it up correctly.
What You Will Learn/Prerequisites
You’ll learn how to:
Add your custom domain or subdomain (e.g., app.myownwebsite.com) to your Clixio account.
Update DNS records with your domain registrar (e.g., GoDaddy, Namecheap).
Verify the domain works for your sites, funnels, or email services.
Prerequisites:
An active Clixio account (set up by Kath, with login access).
Ownership of a custom domain (e.g., myownwebsite.com) registered with a provider like GoDaddy, Cloudflare, or Google Domains.
Admin access to your domain registrar’s DNS settings (you’ll need login credentials).
An email from Clixio with domain setup instructions or DNS records (if they’ve sent them).
A browser (Chrome, Safari, etc.) and stable internet connection.
How To
Follow these steps to add your custom domain to your Clixio account. Clixio’s team may assist with parts of the process, but you’ll handle DNS changes unless they manage your domain.
Step 1: Log Into Your Clixio Account
Open your browser and go to the Clixio login URL (app.clixio.io).
Sign in with your email and password (set up via Clixio’s invitation link).
If you can’t log in, check your email for the invite or contact Clixio support to resend it.
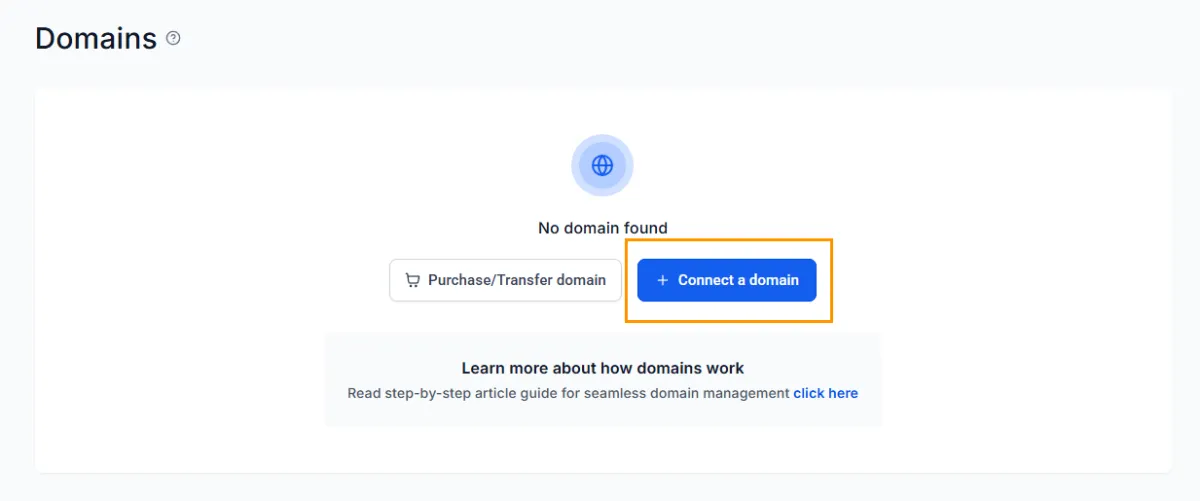
Step 2: Access Domain Settings
In your account dashboard, click Settings (in the left sidebar on the bottom).
Navigate to Domains & URL Redirects (may be labeled as “Custom Domains” or “Branded Domain”).
Click Add Domain or Connect a Domain to start the process.
Note: If you don’t see this option, contact Kath's Team—they may need to enable domain settings for your plan.
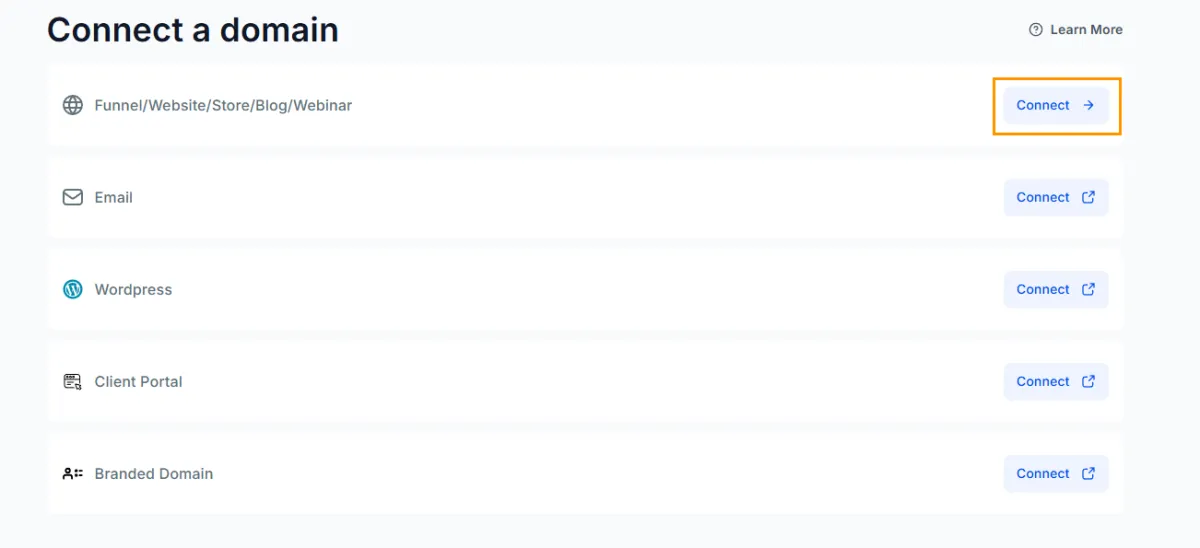
Step 3: Enter Your Domain
In the domain setup wizard, enter your domain or subdomain:
For funnels/sites: Use a subdomain like forms.myownwebsite.com.
For email or branding: Use app.myownwebsite.com or your root domain (myownwebsite.com).
Select the purpose (e.g., Sites/Funnels, Email Sending) if prompted.
Click Next. Clixio may offer Domain Connect for supported providers (GoDaddy, Cloudflare, Google Domains) or require manual DNS setup.
Step 4: Configure DNS Records
If Using Domain Connect (for supported providers):
Click Authorize to open your registrar’s DNS panel in a new tab.
Log into your provider (e.g., GoDaddy) and follow prompts to auto-add records (e.g., CNAME for forms.myownwebsite.com pointing to proxy.hl.cloud).
Return to Clixio’s dashboard and click Verify (wait 5-60 minutes for propagation).
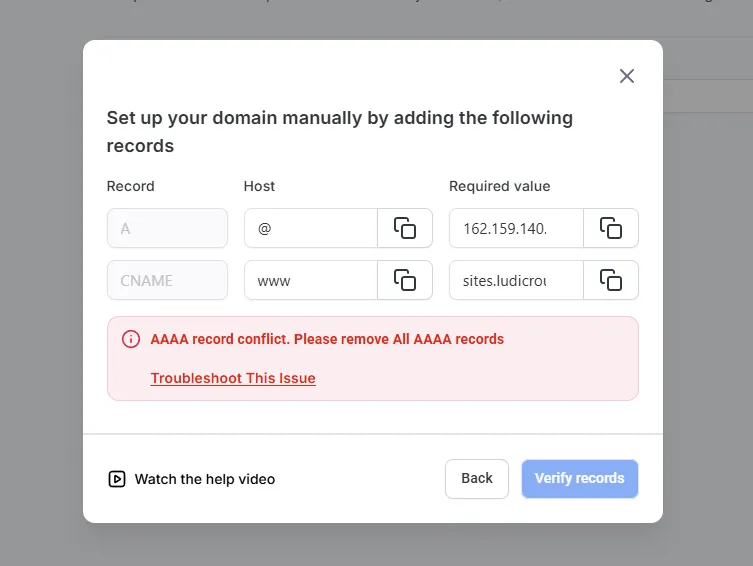
If Manual DNS Setup:
Clixio will provide DNS records in the wizard (or via email). Common records include:
CNAME: Host: forms (or app), Value: proxy.hl.cloud (or as specified).
A Record (if root domain): Host: @, Value: 75.2.70.75 (confirm with Clixio).
TXT (for verification/email): Host: @, Value: gohighlevel-domain-verification=yourcode.
Log into your domain registrar (e.g., GoDaddy: My Products > DNS > Manage Zones).
Add the records exactly as provided, ensuring no extra spaces.
If using Cloudflare, set Proxy to “DNS Only” (gray cloud).
Save changes. Propagation may take 1-48 hours (check with whatsmyDNS.net).
Step 5: Verify Your Domain
Back in your account’s Settings > Domains, click Verify Domain.
If successful, the status will show “Connected” or “Active.”
Test by creating a sample funnel (Sites > Create New) and previewing it on your domain (e.g., forms.myownwebsite.com/test-funnel).
If verification fails, double-check DNS records or contact Clixio with a screenshot of your settings.
Step 6: Notify Kath and Team
Email or message Kath's support team to confirm you’ve added the domain and completed DNS changes.
They’ll verify the setup on their end and ensure your account uses the domain for funnels, sites, or email.
If you want us to manage DNS, provide us with your registrar login (securely) or transfer the domain to our control.
Exceptions: Troubleshooting Common Issues
Exception 1: Domain Connect Authorization Fails
Ensure you’re logged into the correct registrar account.
Try a different browser or incognito mode.
Switch to manual DNS setup if the issue persists (ask Clixio for records).
Exception 2: Domain Verification Fails
Confirm DNS records match Clixio’s instructions exactly.
Wait up to 48 hours for propagation; check status with whatsmyDNS.net.
If using Cloudflare, ensure Proxy is “DNS Only.” Run dig CNAME forms.myownwebsite.com in a terminal to debug.
Contact Clixio with your domain and error details.
Exception 3: Domain Already in Use or Conflicts
If your domain is tied to another service (e.g., WordPress), notify Clixio—they’ll adjust records to avoid conflicts.
For email conflicts, ensure MX records point to your email provider (not GoHighLevel unless for dedicated sending).
If another party owns the domain, work with Clixio to transfer or share access.
What Success Looks Like
Your custom domain (e.g., forms.myownwebsite.com) is active in your account, displaying “Connected” in Settings > Domains.
Funnels, sites, or emails use your branded domain instead of Clixio defaults (e.g., app.clixio.io).
A test funnel or site loads securely (with SSL) on your domain without errors.
Clixio confirms the setup, and your campaigns are ready to launch with a professional, branded look—your business is set to shine!